Saturday, 21 May 2016

Product Allocation in Sales Order Entry

Product allocation is incorporated into the sales order process as follows:

Step 1: An order line item is entered for a material currently on allocation.  This is determined by reading the material master and identifying that an allocation procedure is assigned.

Step 2:  An ATP check is then carried out to see if and when the requested quantity can be confirmed.  An ATP check is not, however, a prerequisite for product allocation.

Step 3:  If the order quantity unit is different than the planning unit of measure, the order quantity will be automatically converted prior to the allocation validity.  Secondly, if a conversion factor has been established to represent a constrained component, this factor will be used to calculate the proper allocation requested quantity prior to the allocation check against the planning data.

Step 4:  First, based upon the date in the allocation information structure activation rule, one of three dates (delivery date, material availability date, or planned goods issue date) from the sales order is used to validate the allocation quantity for the requested period. Secondly, depending upon the method selected and the allocation interval, quantities are cumulated and the future proposal dates are determined.

Step 5:  If, after performing the allocation checks, the ATP schedule lines determined above need to be modified to concur with the allocation data, a dialog message is issued to the user to inform them of the change due to allocation.  Then the user will be taken to the availability control screen to verify these altered schedule lines.  From this screen, the user can branch to the product allocation detail screen (Go to -> Product Allocation) to investigate the changes further.

Step 6: Upon acceptance of the delivery proposal, the corresponding allocation quantities are reduced to reflect the consumption of the allocated inventory.  Subsequent orders will then recognize these updated figures. This is accomplished by using the real-time updating capabilities of LIS, which insures that product is not over-allocated.

The allocation check in sales order entry is capable of reading allocation quantities at multiple levels in the LIS planning hierarchy. Allocation would first check to see if planning was done at the most detailed level of the hierarchy.  If so, the planned quantity at this level is used for the validation.  If not, the system continues to read subsequent levels of the hierarchy until a record is found.


Ad-hoc Query

Ad-hoc Query

Most of the reporting needs of an organization can be addressed through Adhoc Queries. 
They provide 3 different kinds of reports:

  • Basic List : For simple reporting
  • Statistics : Reports with statistical functions such as percentages, etc.
  • Ranked list : for easy analysis of the reports

Queries are the actual reports that an end-user can run within SAP, these can be set up in Ad Hoc Query.


This document will cover below area

·  Creating Query area

·  Creating  User Group 

·  Creating  Infoset 

·  Creating  Adhoc query


Query Areas define whether the report is available cross client (Global Area) or only in the client that it is built (Standard Area). If SAP is set to Global Area, then it is not possible to see any reports built in the Standard Area and vice versa. 

Infosets define which infotypes and which fields within those infotypes you can report on

User Groups define which groups of end users can see different infosets

Steps needs to perform for creating ad-hoc query

SQ01 : It is used to report the infoset data by creating ad-hoc query.

SQ02 : Here we will include all of our tables or infotypes (e.g. PA/OM) that will provide us data for our queries.

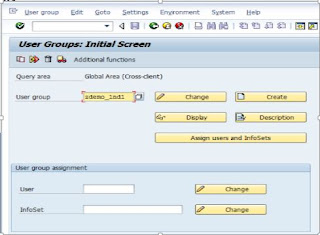
SQ03 : To create a new user group go to transaction SQ03 and create a new user group and assign users to that user group.


Go to the transaction SQ03


Select Query areas under the menu item Environment. Select the radio button ‘Global Area’


Create a user group which will specify the users who will be authorized to run the query. It will always be associated with the functional area


Give short meaningful description & Save


Go to the T-code SQ02 to create the infoset


Give a name to the infoset and click on create.


Provide the Infoset attributes as show below. Here we are using PNP LDB in the example.


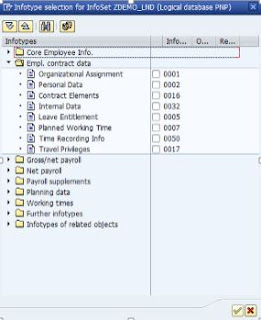
A window with the provision to choose all required infotypes pops up(here PA infotypes as PNP LDB is used). Open the node ‘Empl. Contract data’ as in our example we want to report some personal and org related data of the employees


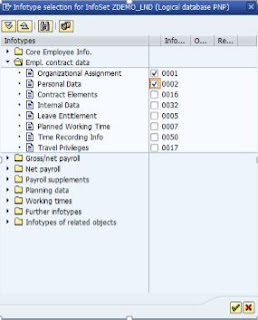
Select the infotypes 0001 and 0002 by selecting the check boxes against them.


The following screen of the created infoset appears as below. Click on save and then Generate the infoset


Go to the main screen and click on Role/User group assignment


Select the assigned user group that we created earlier i.e. ZDEMO_LND and save it.

Now go to the transaction SQ01 to create the Ad-hoc query to report the data from the infoset.

Give a name for the Query (here ZDEMO_QRY) and click on create


Choose our required infoset name which will navigate to below screen.

Provide the query title and other info as shown below. Save and go back to main screen.

Click on Infoset query button below.The Infoset query window opens as below.


Upon expanding the nodes at the left, choose appropriate fields for selection criteria and also for display in the report output


From the menu item Query, save the query with a name

Go back and Execute the query using F8


SD CIN INDIA Localization